# 一. Vite 初始化项目
控制台执行
pnpm create vite或npm init vite@latest依次输入新项目名字,选择 Vue 以及 Ts。(包管理工具不要混用要么用 pnpm 要么用 npm)
PS D:/StudyCode> pnpm create vite
../.pnpm-store/v3/tmp/dlx-13276 | +1 +
Packages are hard linked from the content-addressable store to the virtual store.
Content-addressable store is at: D:/.pnpm-store/v3
Virtual store is at: ../.pnpm-store/v3/tmp/dlx-13276/node_modules/.pnpm../.pnpm-store/v3/tmp/dlx-13276 | Progress: resolved 1, reused 0, downloaded 1, added 1, done
√ Project name: ... TeamplateV3√ Package name: ... teamplatev3√ Select a framework: » Vue
√ Select a variant: » TypeScript
Scaffolding project in D:/StudyCode/TeamplateV3...
Done. Now run:
cd TeamplateV3pnpm install
pnpm run dev执行
pnpm install启动项目:将项目在 vscode 里打开,打开控制台,执行
pnpm run dev 启动项目。package.json文件【"dev": "vite --open"】, 设置 --open,执行完将会自动打开项目。生成的项目会在根目录下生成三个文件,分别是
tsconfig.json、tsconfig.node.json和tsconfig.app.json。其中,
tsconfig.json是项目的主要 TypeScript 配置文件,它引用了其他两个配置文件.tsconfig.json 是 TypeScript 项目的主要配置文件,它包含了 TypeScript 编译器的各种选项设置。一些常见的配置选项包括:
compilerOptions:用于配置编译器选项,例如目标版本、模块系统、输出目录等。include和exclude:用于指定哪些文件应该包含在编译中,哪些文件应该排除在外。files:指定要包含在编译中的文件列表。references:用于配置项目引用,允许在一个 TypeScript 项目中引用另一个 TypeScript 项目。
tsconfig.node.json:
tsconfig.node.json是针对 Node.js 环境的 TypeScript 配置文件。在这个配置文件中,您可以配置与 Node.js 相关的编译选项,以确保 TypeScript 代码能够正确地在 Node.js 环境中运行。例如,您可以配置模块解析方式、Node.js 版本兼容性等选项。
注意到
"include": ["vite.config.ts"]这段代码,它说明tscnofig.node.json是专门用于vite.config.ts这一文件的 TypeScript 配置文件。项目中的普通代码是运行在浏览器环境中的,因此 TypeScript 需要为这些代码提供 DOM 等浏览器接口的类型支持。而vite.config.ts是运行在 Node 环境中的,它不应访问浏览器接口,而相应地它需要各种 Node 接口的类型支持tsconfig.app.json:
tsconfig.app.json是针对应用程序的 TypeScript 配置文件。在这个配置文件中,您可以配置与应用程序开发相关的编译选项,例如调试选项、源映射设置、压缩选项等。这样可以根据应用程序的需求进行定制化的 TypeScript 编译配置。
# 二。格式化配置
# 1. 用户 vscode 配置
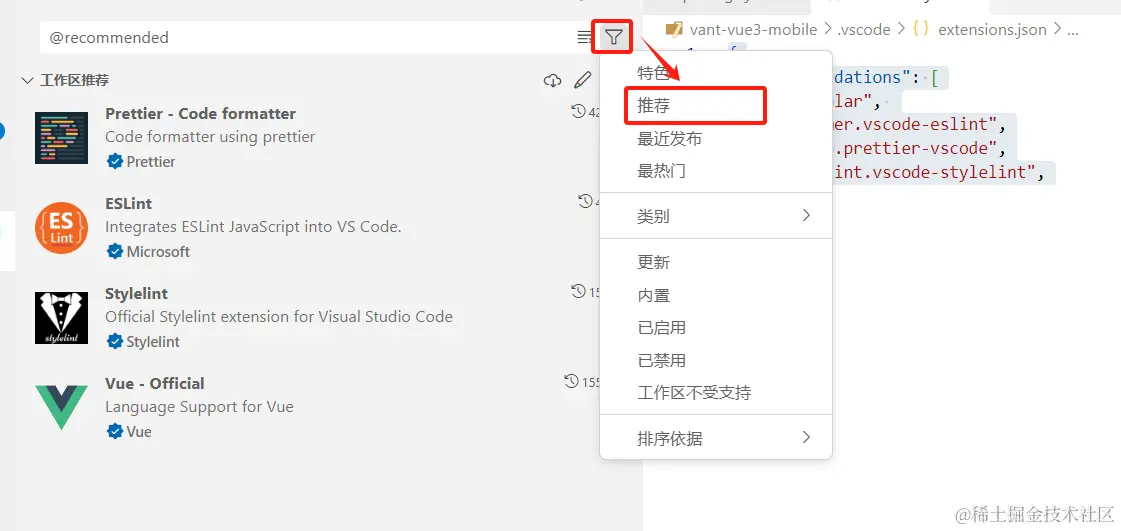
vite 初始化项目后将会生成.vscode 文件夹,里面有
extensions.json文件
# - extensions.json
{ | |
"recommendations": [ | |
"Vue.volar", | |
"dbaeumer.vscode-eslint", | |
"esbenp.prettier-vscode", | |
"stylelint.vscode-stylelint", | |
] | |
} |
recommendations:推荐安装的插件
# - setting.json
setting.json 是自己创的,下面的配置看情况加
{ | |
"editor.defaultFormatter": "esbenp.prettier-vscode", | |
"editor.formatOnSave": true, | |
"eslint.validate": [ | |
"typescript", | |
"vue" | |
], | |
"stylelint.validate": [ | |
"css", | |
"less", | |
"scss", | |
"vue" | |
], | |
"editor.codeActionsOnSave": { | |
"source.fixAll": true, | |
"source.fixAll.eslint": true, | |
"source.fixAll.stylelint": true | |
} | |
} |
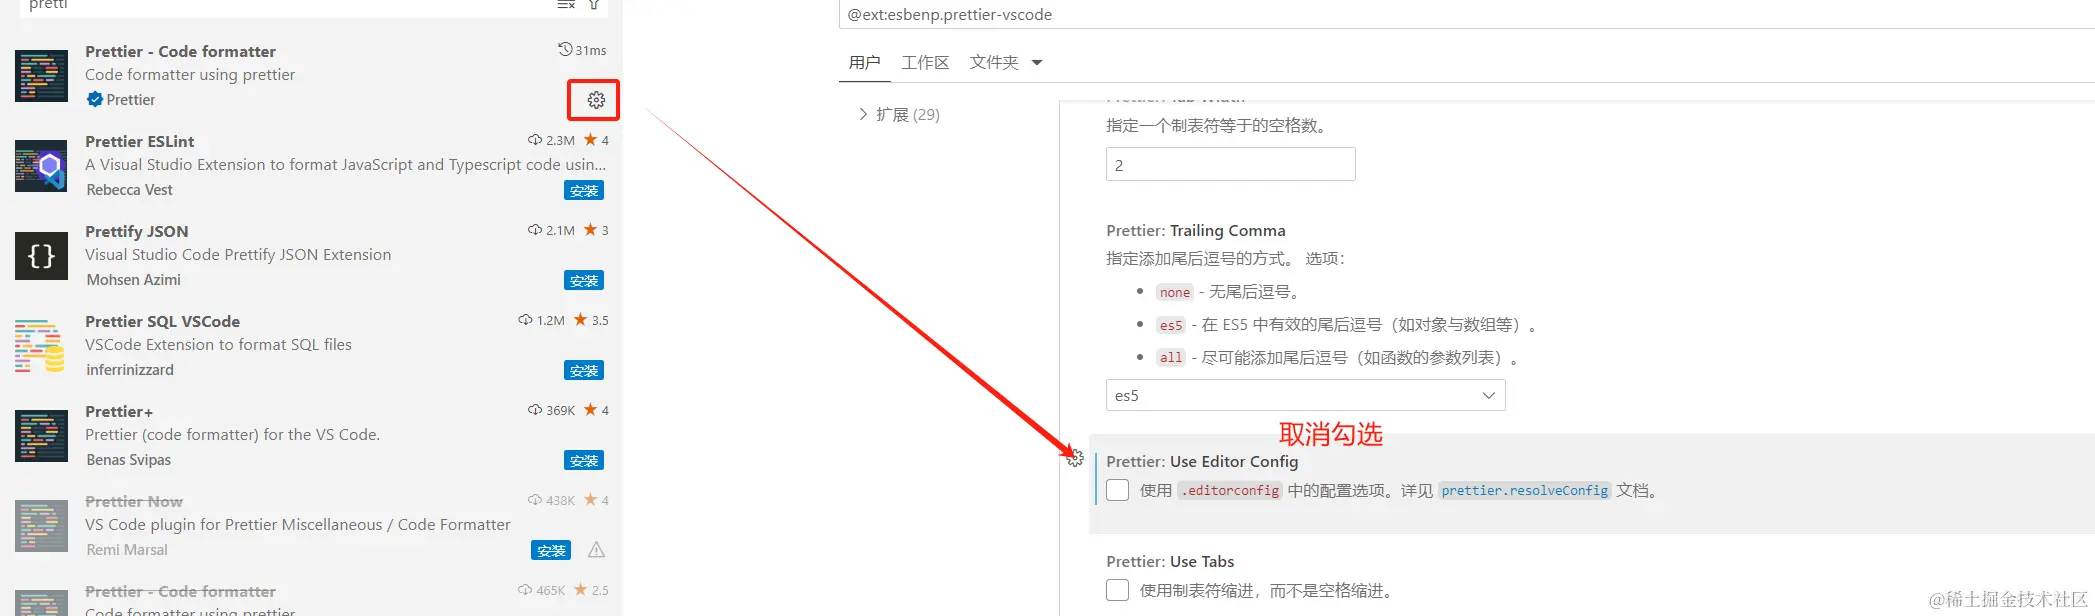
# - prettier 配好了但是不生效
- 解决方式
- 我的解决方式
# 2. Eslint
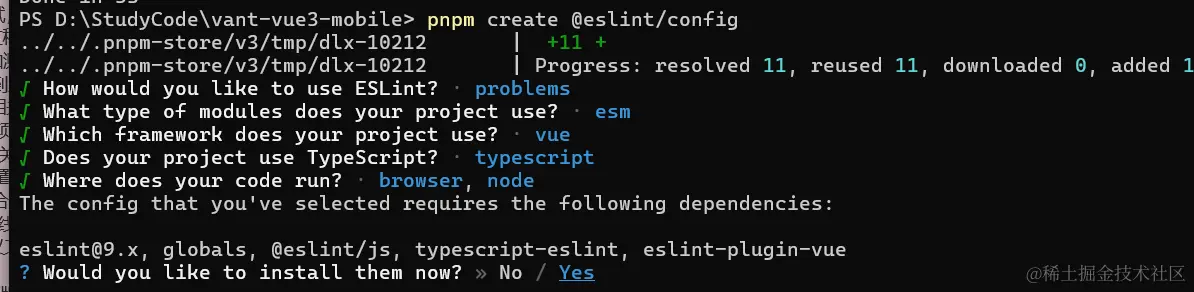
执行
pnpm create @eslint/config或者npm init @eslint/config@latest, 将会自动生成eslint.config.js配置文件。默认使用 eslint9.x,与以往版本的配置写法不同。typescript-eslint- ts-eslint 解析器,使 eslint 可以解析 ts 语法,
@typescript-eslint/parser: ESLint 默认使用的是 Espree 进行语法解析,所以无法对部分 typescript 语法进行解析,需要替换掉默认的解析器@typescript-eslint/eslint-plugin: 作为 eslint 默认规则的补充,提供了一些额外的适用于 ts 语法的规则
eslint-plugin-vue: 这个插件允许我们用 ESLint 检查文件的<template>和,以及文件中的 Vue 代码。
修改
eslint.config.js文件import globals from 'globals'; //https://eslint.org/docs/latest/use/configure/language-options
import pluginJs from '@eslint/js';
import tseslint from 'typescript-eslint'; //https://typescript-eslint.io/getting-started/
import pluginVue from 'eslint-plugin-vue'; //https://eslint.vuejs.org/user-guide/
import vueEslintParser from 'vue-eslint-parser'; //vue 文件解析器
export default [
{languageOptions: {
globals: { ...globals.browser, ...globals.node },
parser: vueEslintParser, // 使用 vue 解析器,这个可以识别 vue 文件
parserOptions: {
ecmaVersion: 'latest',
parser: tseslint.parser, // 在 vue 文件上使用 ts 解析器
sourceType: 'module'
}}},
pluginJs.configs.recommended,
...tseslint.configs.recommended,
...pluginVue.configs['flat/essential'],
{rules: {
// override/add rules settings here, such as:// 'vue/no-unused-vars': 'error',}}];
配置 ignore
# 3. Prettier
官网
安装
pnpm add prettier eslint-plugin-prettier eslint-config-prettier -D- eslint-plugin-prettier 将 Prettier 作为 ESLint 规则运行,并将差异报告为单独的 ESLint 问题。
- eslint-config-prettier
- 启用
prettier/prettier规则。 - 禁用与该插件有问题的
arrow-body-style和prefer-arrow-callback规则 - 启用
eslint-config-prettier配置将关闭与 Prettier 冲突的 ESLint 规则。
- 启用
创建配置文件
node --eval "fs.writeFileSync('.prettierrc','{}/n')"修改
.prettierrc文件如下{"printWidth": 100,
"tabWidth": 4,
"useTabs": false,
"semi": true,
"singleQuote": true,
"quoteProps": "as-needed",
"jsxSingleQuote": false,
"trailingComma": "none",
"bracketSpacing": true,
"jsxBracketSameLine": false,
"proseWrap": "always",
"htmlWhitespaceSensitivity": "ignore",
"arrowParens": "avoid",
"endOfLine": "auto"
}修改
.eslint.config.js文件如下
import globals from 'globals'; //https://eslint.org/docs/latest/use/configure/language-options | |
import pluginJs from '@eslint/js'; | |
import tseslint from 'typescript-eslint'; //https://typescript-eslint.io/getting-started/ | |
import pluginVue from 'eslint-plugin-vue'; //https://eslint.vuejs.org/user-guide/ | |
import vueEslintParser from 'vue-eslint-parser'; //vue 文件解析器 | |
// 关闭所有不必要的或可能与 Prettier 冲突的规则。https://github.com/prettier/eslint-plugin-prettier?tab=readme-ov-file#configuration-new-eslintconfigjs | |
import eslintPluginPrettierRecommended from 'eslint-plugin-prettier/recommended'; | |
export default [ | |
{ | |
languageOptions: { | |
globals: { ...globals.browser, ...globals.node }, | |
parser: vueEslintParser, // 使用 vue 解析器,这个可以识别 vue 文件 | |
parserOptions: { | |
ecmaVersion: 'latest', | |
parser: tseslint.parser, // 在 vue 文件上使用 ts 解析器 | |
sourceType: 'module' | |
} | |
} | |
}, | |
pluginJs.configs.recommended, | |
...tseslint.configs.recommended, | |
...pluginVue.configs['flat/essential'], | |
eslintPluginPrettierRecommended, // 放在最后面 | |
{ | |
rules: { | |
// override/add rules settings here, such as: | |
// 'vue/no-unused-vars': 'error', | |
'prettier/prettier': [ | |
'error', | |
{ | |
// endOfLine: "auto" | |
} | |
] | |
} | |
} | |
]; |
# 4. stylelint
官网
执行
pnpm create stylelint或者npm init stylelint,将会生成.stylelintrc.json文件,自动安装stylelint和stylelint-config-standard依赖执行
pnpm add stylelint-config-recommended-less stylelint-config-standard-vue less -Dstylelint-config-recommended-less--less的推荐可共享配置规则stylelint-config-standard-vue可识别 vue 文件
从 Stylelint v15 开始,所有与样式相关的规则都已弃用。如果您使用的是 v15 或更高版本,并且未使用这些弃用的规则,则 stylelint-config-prettier 插件不再是必要的。
.stylelintrc.json{"extends": [
"stylelint-config-standard",
"stylelint-config-recommended-less",
"stylelint-config-standard-vue"]}
# 三. src 设置别名
更改
vite.config.tsimport { join } from 'path';
function resolve(dir: string):string {
return join(__dirname, dir); // 可以用 process.cwd () path.join () 和 path.resolve ()
}export default defineConfig({
plugins: [vue()],
resolve: {
alias: {
'@': resolve('/src'),
'#': resolve('/types'),
}}})
此时会出现波浪线,执行
pnpm i --save-dev @types/node修改
tsconfig.json"compilerOptions": {
"baseUrl": ".", // 用于设置解析非相对模块名称的基本目录,相对模块不会受到 baseUrl 的影响
"paths": { // 用于设置模块名到基于 baseUrl 的路径映射
"@/*": ["src/*"],
"#/*": ["types/*"],
}}重启 vscode 生效
# 四。配置自动导入
pnpm add unplugin-auto-import unplugin-vue-components -D修改
vite.config.tsimport { defineConfig } from 'vite';
import { join } from 'path';
import vue from '@vitejs/plugin-vue';
import AutoImport from 'unplugin-auto-import/vite';
import Components from 'unplugin-vue-components/vite';
import { AntDesignVueResolver } from 'unplugin-vue-components/resolvers';
function resolve(dir: string): string {
return join(__dirname, dir); // 可以用 process.cwd () path.join () 和 path.resolve ()
}// https://vitejs.dev/config/export default defineConfig({
plugins: [
vue(),
AutoImport({
// 自动导入第三方库或组件 不需要手动编写 import {xxx} from vue//dts: true, // 如果使用 Typescript,需要设置 dts 为 true 插件会在项目根目录生成类型文件 auto-imports.d.ts ,确保该文件在 tsconfig 中被 includedts: 'types/auto-imports.d.ts',
dirs: ['src/composables'], // 文件夹。看情况加
imports: [
'vue',
'vue-router',
'@vueuse/core',
'pinia'// 其他需要自动导入的库]}),
Components({
dts: 'types/components.d.ts', // 输出文件,里面都是一些 import 的组件键值对
dirs: ['src/components'], // 让 src/components 里的组件不用再手动引入
// 配置需要自动注册的组件resolvers: [
AntDesignVueResolver({
//ant-design-vue 不用手动按需引入importStyle: false // css in js
})
]})
],
resolve: {
alias: {
'@': resolve('/src'),
'#': resolve('/types')
}}});
UI 组件库的按需自动导入 (看各自的官网)
vant
ant-design-vue
import { AntDesignVueResolver } from 'unplugin-vue-components/resolvers';
Components({
// 配置需要自动注册的组件resolvers: [
AntDesignVueResolver({
//ant-design-vue 不用手动按需引入importStyle: false // css in js
})
]})
安装其他依赖
pnpm i @vueuse/core vue-router pinia axios确保该文件在
tsconfig.json中被include
{ | |
"compilerOptions": { | |
"target": "ES2020", | |
"useDefineForClassFields": true, | |
"module": "ESNext", | |
"lib": ["ES2020", "DOM", "DOM.Iterable"], | |
"skipLibCheck": true, | |
/* Bundler mode */ | |
"moduleResolution": "bundler", | |
"allowImportingTsExtensions": true, | |
"resolveJsonModule": true, | |
"isolatedModules": true, | |
"noEmit": true, | |
"jsx": "preserve", | |
"jsxImportSource": "vue", | |
/* Linting */ | |
"strict": true, | |
"noUnusedLocals": true, | |
"noUnusedParameters": true, | |
"noFallthroughCasesInSwitch": true, | |
/* path */ | |
"baseUrl": ".", // 用于设置解析非相对模块名称的基本目录,相对模块不会受到 baseUrl 的影响 | |
"paths": { | |
// 用于设置模块名到基于 baseUrl 的路径映射 | |
"@/*": ["src/*"], | |
"#/*": ["types/*"] | |
} | |
}, | |
"include": ["src/**/*.ts", "src/**/*.d.ts", "src/**/*.tsx", "src/**/*.vue", "types/**/*.d.ts"], | |
"references": [{ "path": "./tsconfig.node.json" }] | |
} |
新建 style 文件夹。滚动条样式 npprogress/ 路由过渡样式等
# 五。创建环境变量
vite 环境变量
根级目录下创建文件
.env.development和.env.production# 环境NODE_ENV=production
# 接口前缀VITE_APP_BASE_API=dev
# 打包路径VITE_BASE_PATH=/dist-dev/
# 是否删除 debuggerVITE_DROP_DEBUGGER=false
# 是否删除 console.logVITE_DROP_CONSOLE=false
# 是否 sourcemapVITE_SOURCEMAP=true
# 输出路径VITE_OUT_DIR=dist-dev
# 标题VITE_APP_TITLE=ElementAdmin
获得
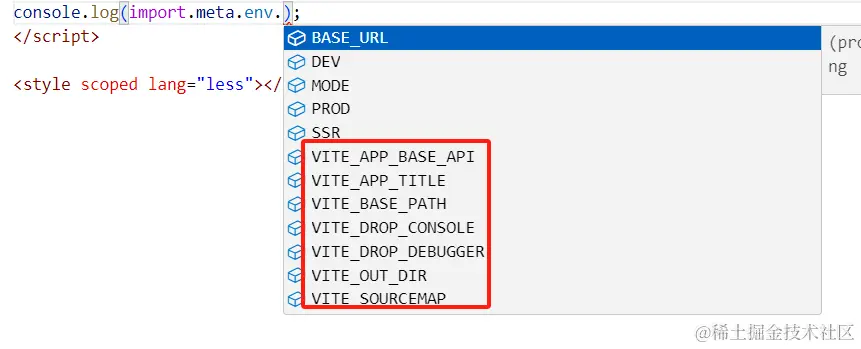
TypeScript的智能提示默认情况下,Vite 在
vite/client.d.ts中为import.meta.env提供了类型定义。随着在.env[mode]文件中自定义了越来越多的环境变量,你可能想要在代码中获取这些以VITE_为前缀的用户自定义环境变量的 TypeScript 智能提示。要想做到这一点,你可以在src目录下创建一个vite-env.d.ts文件 (vite 项目初始化时默认创建了),接着按下面这样增加ImportMetaEnv的定义:/// <reference types="vite/client" />interface ImportMetaEnv {
readonly VITE_APP_TITLE: string; // 网站标题
readonly VITE_APP_BASE_API: string; // 接口前缀
readonly VITE_BASE_PATH: string; // 打包路径
readonly VITE_DROP_DEBUGGER: string; // 是否删除 debugger
readonly VITE_DROP_CONSOLE: string; // 是否删除 console.log
readonly VITE_SOURCEMAP: string; // 是否 sourcemap
readonly VITE_OUT_DIR: string; // 输出路径
// 更多环境变量...}interface ImportMeta {
readonly env: ImportMetaEnv;
}- 使用举例:
import.meta.env.VITE_APP_TITLE - 在配置
vite.config.ts中使用环境变量
import { defineConfig, loadEnv } from 'vite'
export default defineConfig(({ command, mode }) => {
// 根据当前工作目录中的 `mode` 加载 .env 文件// 设置第三个参数为 '' 来加载所有环境变量,而不管是否有 `VITE_` 前缀。const env = loadEnv(mode, process.cwd(), '')
return {
//vite 配置define: {
__APP_ENV__: JSON.stringify(env.APP_ENV),
},
}})
- HTML 环境变量替换
<h1>Vite is running in %MODE%</h1>
<p>Using data from %VITE_API_URL%</p>
如果环境变量在
import.meta.env中不存在,比如不存在的%NON_EXISTENT%,则会将被忽略而不被替换,这与 JS 中的import.meta.env.NON_EXISTENT不同,JS 中会被替换为undefined。- 使用举例:
# 六。浏览器适配
Vant 默认使用
px作为样式单位,如果需要使用viewport单位 (vw, vh, vmin, vmax),推荐使用 postcss-px-to-viewport 进行转换。
安装依赖
pnpm add -D postcss-px-to-viewport-8-plugin安装 postcss-px-to-viewport 时,当前版本 v1.1.1 长期未更新,include 在 vue3 项目中实测不生效。不设置或者将其设置成 include: undefined 如果控制台会报以下错误:postcss-px-to-viewport: postcss.plugin was deprecated. Migration guide: 可以通过将 postcss-px-to-viewport 换成 postcss-px-to-viewport-8-plugin 解决
vite.config.ts配置import pxtovw from 'postcss-px-to-viewport-8-plugin';
css: {
devSourcemap: true, // 在开发过程中是否启用 sourcemap。
postcss: {
plugins: [
pxtovw({
unitToConvert: 'px', // 要转化的单位
viewportWidth: 375, // UI 设计稿的宽度
unitPrecision: 6, // 转换后的精度,即小数点位数
propList: ['*'], // 指定转换的 css 属性的单位,* 代表全部 css 属性的单位都进行转换
viewportUnit: 'vw', // 指定需要转换成的视窗单位,默认 vw
fontViewportUnit: 'vw', // 指定字体需要转换成的视窗单位,默认 vw
selectorBlackList: [], // 指定不转换为视窗单位的类名,
minPixelValue: 1, // 默认值 1,小于或等于 1px 则不进行转换
mediaQuery: true, // 是否在媒体查询的 css 代码中也进行转换,默认 false
//replace: true, // 是否直接更换属性值,而不添加备用属性exclude: [/^(?!.*node_modules//vant)(?!.*__uno/.css)/], // 忽略某些文件夹下的文件或特定文件,例如 'node_modules' 下的文件
//include: undefined, // 如果设置了 include,那将只有匹配到的文件才会被转换landscape: false // 是否处理横屏情况
})
]}},
注意:postcss-px-to-viewport对内联 css 样式,外联 css 样式,内嵌css样式有效,对 js动态css无效。 所以要动态改变 css 展示效果的话,要使用静态的 class 定义变化样式,通过 js 改变 dom 元素的class实现样式变化- vue 模板中的 px 单位不会被转换,如需转换请使用
postcss-style-px-to-viewport工具
解决 vant 和 postcss-px-to-viewport 的配合
一般我们的设计稿都是 750,而 vant 的设计稿是 375,这就出现一种冲突。以 750 执行的话,则 vant 组件会变小
- # postcss-px-to-viewport 移动端适配
在 vant 库里,我们依然用 375 的设计稿的宽度,其它的文件我们依然用 750 设计稿的宽度
//postcss.config.jsconst path = require('path');
module.exports = ({webpack }) => {
const designWidth = webpack.resourcePath.includes(path.join('node_modules', 'vant')) ? 375 : 750;
return {
plugins: {
'postcss-px-to-viewport': {
viewportWidth: designWidth, // 视窗的宽度,对应的是我们设计稿的宽度,一般是 750
//viewportHeight: 1334, // 视窗的高度,根据 750 设备的宽度来指定,一般指定 1334,也可以不配置},
}}}//vite.config.tspxToViewport({
unitToConvert: 'px', // 要转化的单位
viewportWidth: file => (join(file).includes(join('node_modules', 'vant')) ? 375 : 750), // UI 设计稿的宽度
unitPrecision: 6, // 转换后的精度,即小数点位数
propList: ['*'], // 指定转换的 css 属性的单位,* 代表全部 css 属性的单位都进行转换
viewportUnit: 'vw', // 指定需要转换成的视窗单位,默认 vw
fontViewportUnit: 'vw', // 指定字体需要转换成的视窗单位,默认 vw
selectorBlackList: [], // 指定不转换为视窗单位的类名,
minPixelValue: 1, // 默认值 1,小于或等于 1px 则不进行转换
mediaQuery: true, // 是否在媒体查询的 css 代码中也进行转换,默认 false
//replace: true, // 是否直接更换属性值,而不添加备用属性exclude: [/^(?!.*node_modules//vant)(?!.*__uno/.css)/], // 忽略某些文件夹下的文件或特定文件,例如 'node_modules' 下的文件
//include: undefined, // 如果设置了 include,那将只有匹配到的文件才会被转换landscape: false // 是否处理横屏情况
})
注意:这里使用 path.join ('node_modules', 'vant') 是因为适应不同的操作系统,在 mac 下结果为 node_modules/vant,而在 windows 下结果为 node_modules/vant
- Vant 组件的设计稿尺寸是 375px,可用通过覆盖:root 下的 Vant 的 css 变量中 px 单位的方式,对 Vant 组件做适配
# 七。引入 Unocss
pnpm add -D unocss// vite.config.tsimport UnoCSS from 'unocss/vite'
import { defineConfig } from 'vite'
export default defineConfig({
plugins: [
UnoCSS(),
],
})
创建
uno.config.ts文件:// uno.config.tsimport { defineConfig, presetTypography, presetUno } from 'unocss';
import presetRemToPx from '@unocss/preset-rem-to-px';
export default defineConfig({
// 排除content: {
pipeline: {
exclude: ['node_modules']
}},
// ...UnoCSS optionspresets: [
// 默认预设presetUno(),
// 文字排版预设presetTypography(),
presetRemToPx({
baseFontSize: 4 // 设置为 4,实现 w-1=1px
})
],
/** 自定义规则 */rules: [
// ['font-bold', { fontWeight: 'bold' }],// ['text-base', { fontSize: '16px'}]],
/** 自定义快捷方式 */shortcuts: {
'm-0-auto': 'm-0 ma', // margin: 0 auto
'wh-full': 'w-full h-full', // width: 100%, height: 100%
'flex-center': 'flex justify-center items-center', //flex 布局居中
'flex-x-center': 'flex justify-center', //flex 布局:主轴居中
'flex-y-center': 'flex items-center', //flex 布局:交叉轴居中
'text-overflow': 'overflow-hidden whitespace-nowrap text-ellipsis', // 文本溢出显示省略号
'text-break': 'whitespace-normal break-all break-words' // 文本溢出换行
}});
将
virtual:uno.css添加到您的主入口文件:// main.tsimport 'virtual:uno.css'
使用插件
@unocss/preset-rem-to-px,这个插件的作用就是将 unocss 的预设单位 rem 转换成 pxpnpm add @unocss/preset-rem-to-px -D
# 六。封装 Axios
src 同级新建 untils 文件夹,创建 request.ts 文件。 即utils/request.ts
转自: https://juejin.cn/post/7379818614361325578?searchId=202408072140033BD449C05308D80C54A3#heading-1